Brewhaus Forum
»
General Topics
»
Our Projects
»
Simple Copper Parrot Construction
 Rank: Senior Member Groups: Registered, Moderator
Joined: 4/14/2010(UTC)
Posts: 1,666
Was thanked: 16 time(s) in 16 post(s)
|
"I know this thread is getting drawn out but I came across a piece of icemaker copper today and so I put it to use. I buffed it to shine it abit and then did a re-model to one of my parrots. This is what it was before I changed it... 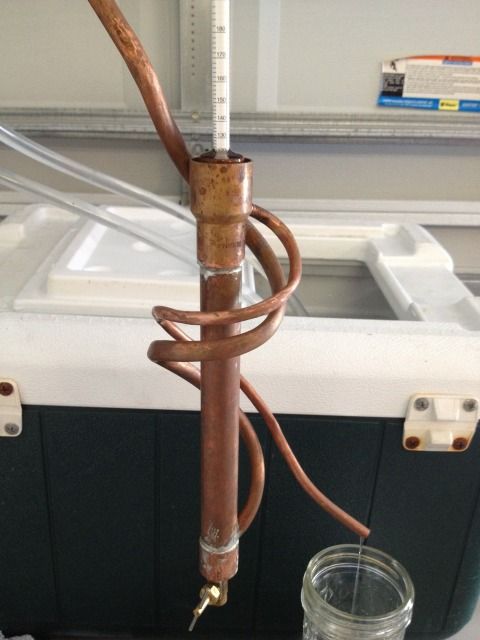 "
|
|
|
|
|
|
Rank: Senior Member Groups: Registered, Moderator
Joined: 4/14/2010(UTC)
Posts: 1,666
Was thanked: 16 time(s) in 16 post(s)
|
"And this is after the re-do, again just something that beat me and my ADD just would'nt have that. Again the coils are not a must just another way of getting hooch from the parrot to the collection jug. 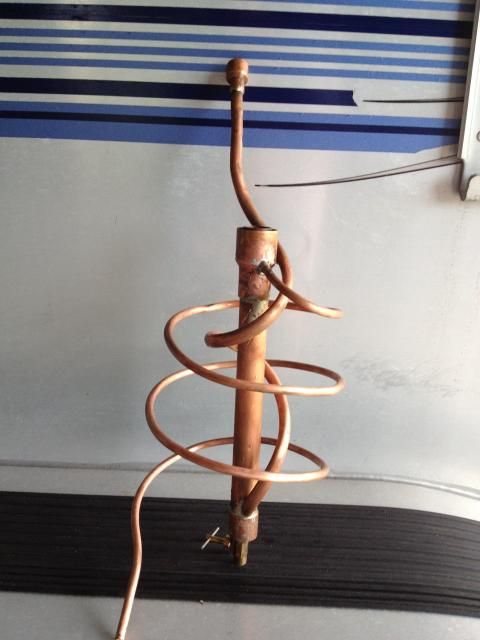 "
|
|
|
|
|
|
Rank: Senior Member Groups: Registered, Moderator
Joined: 4/14/2010(UTC)
Posts: 1,666
Was thanked: 16 time(s) in 16 post(s)
|
"So now these 2 are my new favorites...  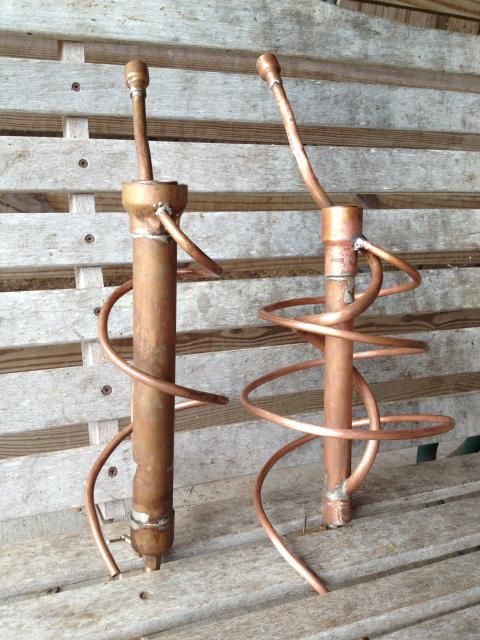 "
|
|
|
|
|
|
Rank: Senior Member Groups: Registered, Moderator
Joined: 4/14/2010(UTC)
Posts: 1,666
Was thanked: 16 time(s) in 16 post(s)
|
So if anybody wants to give it a go just remember that icemaker copper is like 1/4" ( not exactly sure really) and really easy to manipulate into coils, so easy a caveman can do it......one of these days I'm gonna learn to solder too!
|
|
|
|
|
|
Rank: Senior Member Groups: Registered
Joined: 11/15/2012(UTC)
Posts: 720
Was thanked: 11 time(s) in 11 post(s)
|
"Yea Sah, Ice making copper is 1/4""... I'm gonna approach building a parrot like one of your's next payday...I just had to give work and music a few extra weekends I wasn't counting on ;D
I'm still tryin to figgure out how to put a base on that so it can sit agin my work bench .. But with the drain off valve at the bottom, the base supports have'ta arch up fairly high (Thinkin a 3 point base)" |
|
|
|
|
|
|
Rank: Senior Member Groups: Registered, Moderator
Joined: 4/14/2010(UTC)
Posts: 1,666
Was thanked: 16 time(s) in 16 post(s)
|
" Originally Posted by: RoyseCityRed  Yea Sah, Ice making copper is 1/4""... I'm gonna approach building a parrot like one of your's next payday...I just had to give work and music a few extra weekends I wasn't counting on ;D
I'm still tryin to figgure out how to put a base on that so it can sit agin my work bench .. But with the drain off valve at the bottom, the base supports have'ta arch up fairly high (Thinkin a 3 point base) Well go to the store and find one of these little valves and you will see that it has threads on both ends. Now back to your copper, if you look at the pic above you will see the coupling or cap on the bottom of the up right, you could drill a hole in the side of the cap at the very bottom (you know come out from the side instead of out the bottom) and then go from there on how to make it stand. Just something to ponder, I bet I could figger it out but you see the stuff I make and you prolly have better taste and higher standards than me. Oh well hope ya get it worked out."
|
|
|
|
|
|
Rank: Senior Member Groups: Registered
Joined: 11/15/2012(UTC)
Posts: 720
Was thanked: 11 time(s) in 11 post(s)
|
Originally Posted by: heeler I bet I could figger it out but you see the stuff I make and you prolly have better taste and higher standards than me. Oh well hope ya get it worked out. "better taste and higher standards " Heh- You'd be surprised - I build crap in 'beta' all the time, and the final release seldom looks the same. Been that way for 38+ years in my career, why should this be any different Besides, I'm a hillbilly outside of work.... by choice  |
|
|
|
|
|
|
Rank: Senior Member Groups: Registered
Joined: 1/24/2012(UTC)
Posts: 630
Thanks: 1 times
Was thanked: 13 time(s) in 13 post(s)
|
Anyone have an idea of how to hook one to the end of the condenser ?
|
|
|
|
|
|
Rank: Senior Member Groups: Registered, Moderator
Joined: 4/14/2010(UTC)
Posts: 1,666
Was thanked: 16 time(s) in 16 post(s)
|
"Hey take a look back at the parrots....you will see a slip coupling on the end of each. With my condenser its a 1/2"" tube in the middle and a 1"" tube on the outside. Each of those parrots just push right on to the 1/2"" copper thats coming out if the condenser and hang right there, I've never had one slip off so I can recommend this way of fast easy attatchment.
One more thing...sometimes I have to re-adjust the level of the parrot but the copper on the neck of the parrot is pretty easy to manipulate and get the hydrometer to sit center and level."
|
|
|
|
|
|
Rank: Senior Member Groups: Registered, Moderator
Joined: 4/14/2010(UTC)
Posts: 1,666
Was thanked: 16 time(s) in 16 post(s)
|
"Finally got a chance to use my newest parrot, I'm gettin about 170 in this pic and it does work so no worries 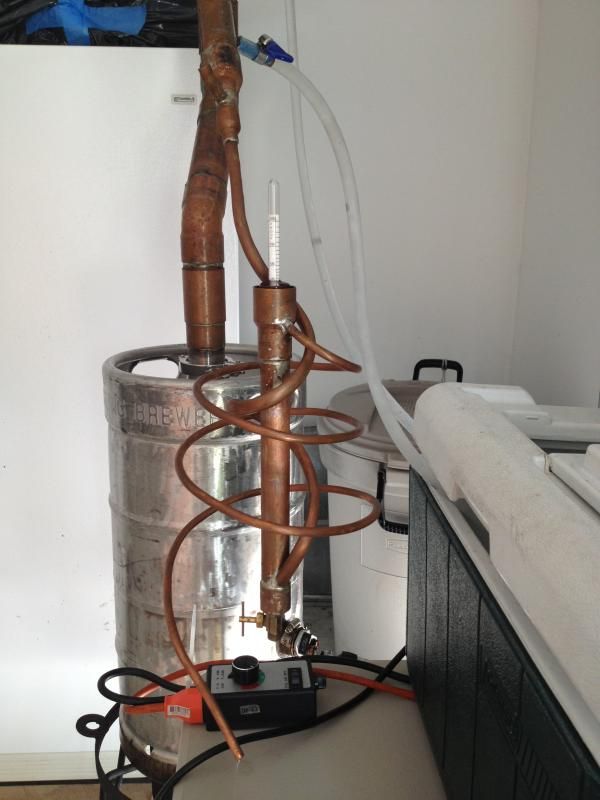 "
|
|
|
|
|
|
Rank: Senior Member Groups: Registered
Joined: 1/24/2012(UTC)
Posts: 630
Thanks: 1 times
Was thanked: 13 time(s) in 13 post(s)
|
Is that soldered to your condenser ? Looks pretty fancy
|
|
|
|
|
|
 Rank: Junior Member Groups: Registered
Joined: 6/11/2013(UTC)
Posts: 134
Was thanked: 1 time(s) in 1 post(s)
|
"i did some tweaking to both  " kane attached the following image(s):  001.JPG (139kb) downloaded 5 time(s).You cannot view/download attachments. Try to login or register.
|
|
|
|
|
|
Rank: Senior Member Groups: Registered, Moderator
Joined: 4/14/2010(UTC)
Posts: 1,666
Was thanked: 16 time(s) in 16 post(s)
|
"Diesel, if you look closely you will see that its a slip fitting on the inlet tube of the parrot. It just slips on and hangs there so no its not soldered on -- again its a slip coupling.  (look back at post #62 and you'll see what I mean) Kane, that looks pretty cool, I dont think you would have needed that air outlet since your parrot isn't connected right to the outlet of the condenser, but no worries anyway, just something I noticed. Looks like it'll work just dandy. "
|
|
|
|
|
|
Rank: Junior Member Groups: Registered
Joined: 6/11/2013(UTC)
Posts: 134
Was thanked: 1 time(s) in 1 post(s)
|
i found if connect the parrot it will build back pressure and cause leaks in the boiler / least it did on mine so i modified it twice now i got it going
|
|
|
|
|
|
Rank: Senior Member Groups: Registered, Moderator
Joined: 4/14/2010(UTC)
Posts: 1,666
Was thanked: 16 time(s) in 16 post(s)
|
Originally Posted by: kane i found if connect the parrot it will build back pressure and cause leaks in the boiler / least it did on mine so i modified it twice now i got it going You are right but in the pic above the parrots not connected. But no worries it works either way glad ya got it figgered out.
|
|
|
|
|
|
Rank: Senior Member Groups: Registered, Moderator
Joined: 4/14/2010(UTC)
Posts: 1,666
Was thanked: 16 time(s) in 16 post(s)
|
I know you fella's have seen my parrots and that little valve I install on the bottom for a drain, well I had to make a store run for my monthly fire ant food and happen to wander through the plumbing section of the store and saw that valve I use and thought I would add a pic to this thread just in case anybody wants a visual for a future purchase. The price was $8. 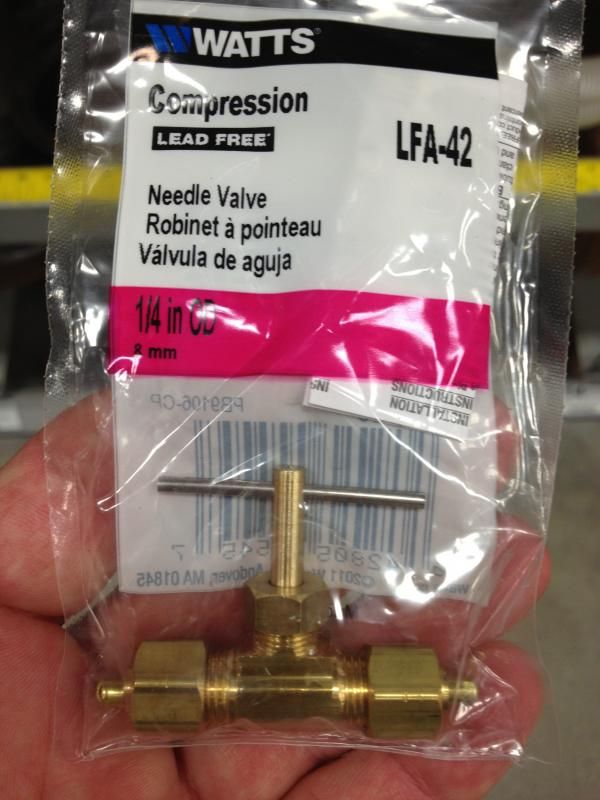 Anyway what I do is remove both little nipples and screw it right into the fitting. You could leave the nipple on one side and add a hose to it if you wanted too but what ever works for ya...... I also solder the valve into the fitting so you MUST take the T handle portion of the valve off before you solder it to the parrot or of course it will melt the seal inside the valve.
|
|
|
|
|
|
Rank: Senior Member Groups: Registered, Moderator
Joined: 4/14/2010(UTC)
Posts: 1,666
Was thanked: 16 time(s) in 16 post(s)
|
"This is just a view of how I install em and as I said one day I'm gonna learn to solder....you could come out the side of the down tube for a side discharge if you wanted to. That way you could make a stand for it too. 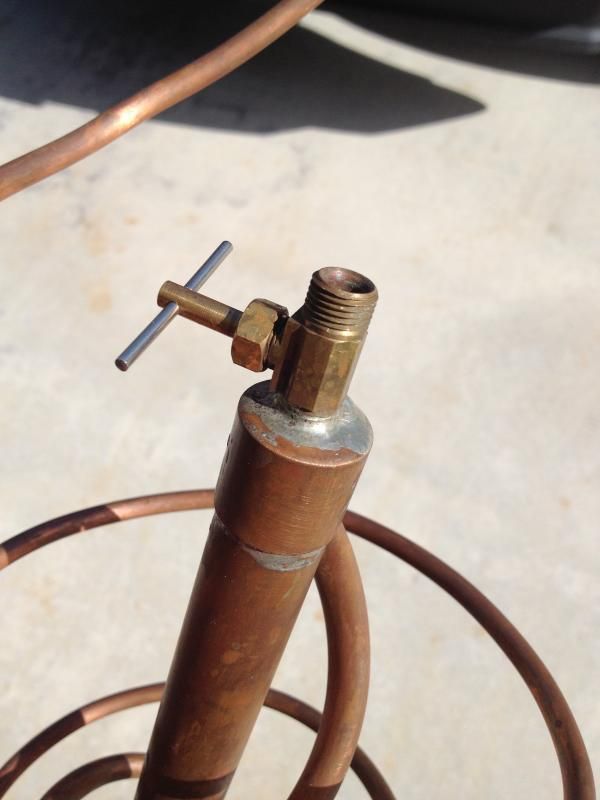 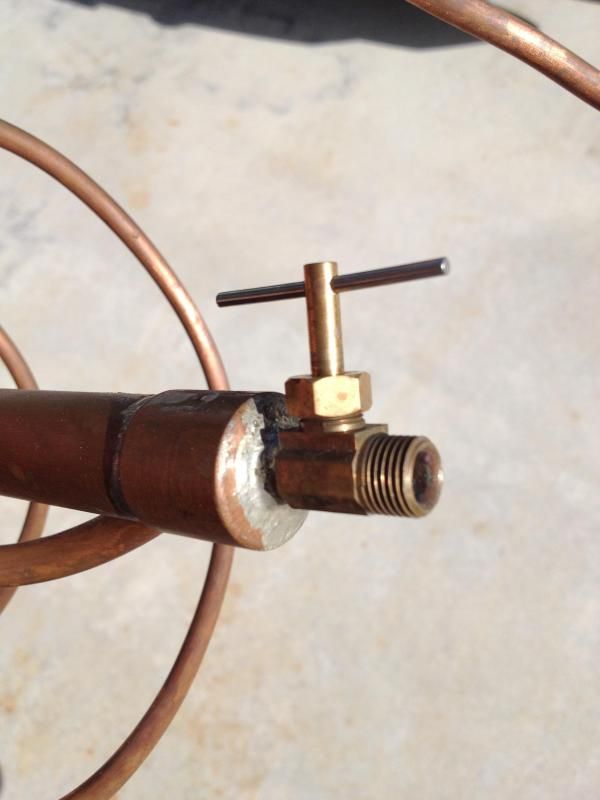 "
|
|
|
|
|
|
Rank: Senior Member Groups: Registered, Moderator
Joined: 4/14/2010(UTC)
Posts: 1,666
Was thanked: 16 time(s) in 16 post(s)
|
"New discovery with shitty results, in my parrots I added a waded up piece of SS mesh and pushed it down to the bottom in the hopes that if I dropped my hydrometer it would bounce and not break, well good idea no dought. No breakage yet but the discovery was that wet SS left against copper and brass makes for a really shitty distillate, kinda like rusty high proof somethingoranother.....yucky. At first I did'nt know what was causeing the nasty aroma but after I changed out my parrots it hit me as the first dribbles were coming over. Learn form my mistakes and use copper mesh or be damned careful not to drop your hydrometer in the parrot.
Of course you could just wait until its pretty full before adding it too, oh well live and learn."
|
|
|
|
|
|
Brewhaus Forum
»
General Topics
»
Our Projects
»
Simple Copper Parrot Construction
Forum Jump
You cannot post new topics in this forum.
You cannot reply to topics in this forum.
You cannot delete your posts in this forum.
You cannot edit your posts in this forum.
You cannot create polls in this forum.
You cannot vote in polls in this forum.