Brewhaus Forum
»
General Topics
»
Our Projects
»
Simple Copper Parrot Construction
 Rank: Senior Member Groups: Registered, Moderator
Joined: 4/14/2010(UTC)
Posts: 1,666
Was thanked: 16 time(s) in 16 post(s)
|
"Well I know you fellers are prolly getting tired of all these parrot posts but I had to modify one of mine ---just because dammit---this is the one that stood on its own but it now hangs from the condenser spout. I'm still trying the coil copper thing and I've almost got it...but first some explination of the process. I took a 1""x1.5"" reducer and cut some of the overburden off to lighten it up abit. 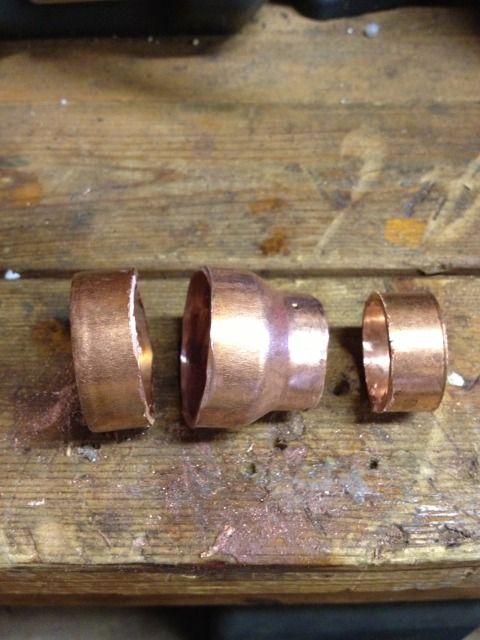 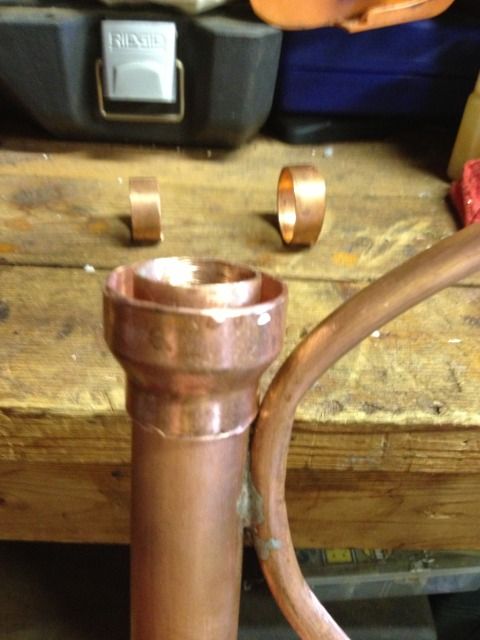 "
|
|
|
|
|
|
Rank: Senior Member Groups: Registered, Moderator
Joined: 4/14/2010(UTC)
Posts: 1,666
Was thanked: 16 time(s) in 16 post(s)
|
"I do like the catchcup idea, then came the coiling AGAIN.....it definatley got better this time. Ya know maybe its getting easier....thats ice maker copper from a fridge - softer than most and pretty easy to munipulate. 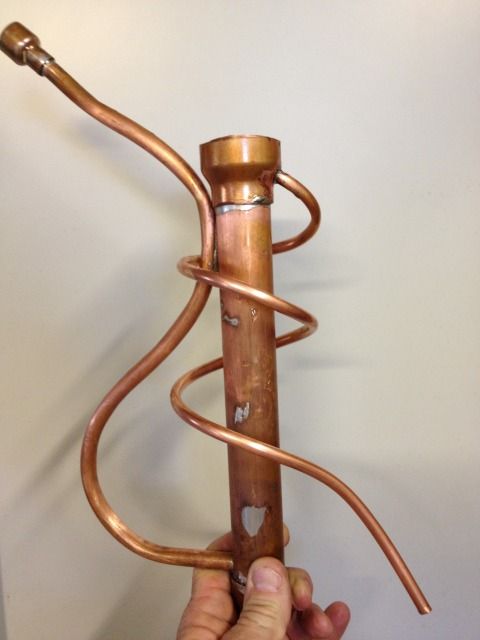 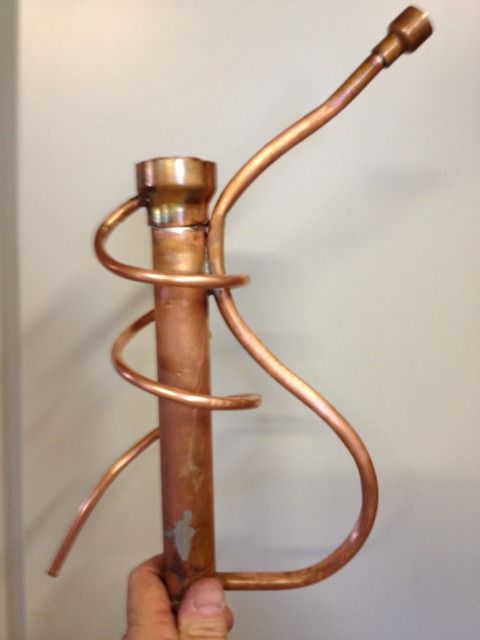 "
|
|
|
|
|
|
Rank: Senior Member Groups: Registered, Moderator
Joined: 4/14/2010(UTC)
Posts: 1,666
Was thanked: 16 time(s) in 16 post(s)
|
"I had to clamp it with vise grips to get the drip tube to stay in that just right spot and as you can see it is right on the money. And then the front view just to finish it off. Its still not as pretty as some but I think it will work and I have a wash thats almost done to try it on.   "
|
|
|
|
|
|
Rank: Senior Member Groups: Registered, Moderator
Joined: 4/14/2010(UTC)
Posts: 1,666
Was thanked: 16 time(s) in 16 post(s)
|
"Bushy and Capt.
I did the fill with salt and crimp the ends and I also had the little spring bender thats supposed to assist in not crimping the bends. I added salt and crimped the ends...and of course the spring would'nt go over the crimp...arhhhgggg. I did a test run and the spring would'nt get as tight as I wanted anyway but oh well. So no spring but the salt and crimped ends did seem to help it along, but that ice maker copper is really soft anyway.
I just layed it on a 5 gallon bucket bottom and started the coil from there, then as the loop came around I kinda flared it out. Once the coil was made I stretched it and moved it to and fro for the final addition to the parrot.
I'm still not satisfied but for now it'll do. I certainly do appreciate the advise and patience guys."
|
|
|
|
|
|
Rank: Senior Member Groups: Registered
Joined: 1/27/2012(UTC)
Posts: 526
|
Looking good there Heeler.
I have used the spring bender a few times but usually just fill the pipe up, crimp the ends, and bend it around a piece of pipe about the size I want the coil to be. I've used ABS, PVC, and steel pipes for sizeing the coils. Works pretty well if you take your time and don't try to hurry it.
|
|
|
|
|
|
Rank: Advanced Member Groups: Registered
Joined: 12/3/2012(UTC)
Posts: 278
|
That's pretty stylish there Heeler,
Is that 1/4" tube you used on the output? Ya did a nice job on that coil. If you don't want to crimp the ends you can just tape em up with some duct tape, but I agree the main thing is patience.
|
|
|
|
|
|
 Rank: Junior Member Groups: Registered
Joined: 6/23/2012(UTC)
Posts: 38
|
It is kind of amazing how similar our first parrots turn out. Here is my first, finished last night. [ATTACH=CONFIG]735[/ATTACH] While working on it in my head, I was having trouble with the base, so I figured to hang it on the collection jar. [ATTACH=CONFIG]736[/ATTACH] I hate lead free solder. 50/50 is so much easier to control and I seriously doubt that very much lead leaches into the ethanol anyway....but I decided to give it a try anyway just to keep you guys from yelling at me. I was pleasantly surprised. With a small piece and the ability to turn it into position...and some cool new water soluble flux... I can not only get the lead free to wick into a joint but also build it up on those fragile butt connections. I got a couple of kinks in the soft tube so I beat up the rest of the feed pipe to make it look like I meant to do that. Test pipe is 3/4 which is too tight for my float, so I got a skinnier one. Tested (and washed) with some heads I have saved up and it works under laboratory conditions. Clean up and polish was pretty quick with a green pad. Next one I will use one of those spring thingies or maybe a lever bender and put some art on it. Tea Totaler attached the following image(s):  parrot1.jpg (145kb) downloaded 8 time(s). parrot2.jpg (129kb) downloaded 9 time(s).You cannot view/download attachments. Try to login or register.
|
|
|
|
|
|
Rank: Senior Member Groups: Registered, Moderator
Joined: 4/14/2010(UTC)
Posts: 1,666
Was thanked: 16 time(s) in 16 post(s)
|
"This morning it was 45F in Florida and its a great day to be stillin. So I put my two latest creations to work and here's what I found.....If you have a parrot and it hangs from the discharge spout of the condenser it would behoove you to have a valve on the bottom, here's why....As I started my run it hit me ---how do I empty the foreshots out of it so I can segregate the stuff I dont want. Arrrrggggg, of course I thought of that AFTER she was up and runnin and the parrot was full and spitting heads. Well I thought if I replace it with the other one before its to the hearts and it spills no big deal. So thats what I did. So no dought I will add a valve to the bottom of the other one too but not today, they both seem to work but that 3/4"" upright still seems tight. Oh well that just gives me somethiing else to work on.   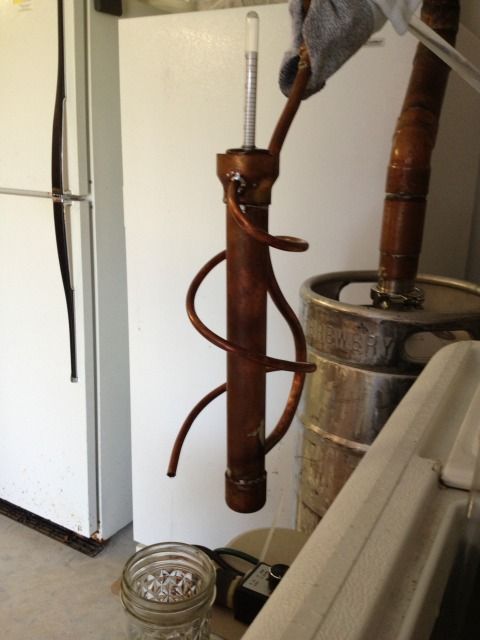 "
|
|
|
|
|
|
Rank: Advanced Member Groups: Registered
Joined: 12/3/2012(UTC)
Posts: 278
|
Hi Heeler,
I was going to ask you if you put a valve on the the bottom of the last one, you can't tell in the pic's because your holding it in your hand. It's got some nice looks hanging there and looks to function well also, nice job...
Captinjack
|
|
|
|
|
|
Rank: Senior Member Groups: Registered, Moderator
Joined: 4/14/2010(UTC)
Posts: 1,666
Was thanked: 16 time(s) in 16 post(s)
|
"Cool thx, I just totally forgot to do this one but thats cause the whole copper coiling thing just about beat me.....well it actually did but I'm not giving up.
But I am gonna add one to it, I think its a must now that I'm back on the right page and thinkin straight."
|
|
|
|
|
|
Rank: Junior Member Groups: Registered
Joined: 11/10/2012(UTC)
Posts: 42
Was thanked: 2 time(s) in 2 post(s)
|
"heeler,
I thought about that before I built my parrot and then it dawned on me....just don't put the parrot under the condenser until after you have collected the fore-shots."
|
|
|
|
|
|
Rank: Senior Member Groups: Registered, Moderator
Joined: 4/14/2010(UTC)
Posts: 1,666
Was thanked: 16 time(s) in 16 post(s)
|
yep thats one way, now when your at the end of the run and take it off and try to pour out whats in it, it goes everywhere but not with the valve on the bottom. You are right a little forethought on my part would take care of it.
|
|
|
|
|
|
Rank: Junior Member Groups: Registered
Joined: 11/10/2012(UTC)
Posts: 42
Was thanked: 2 time(s) in 2 post(s)
|
I believe you were out thinking me, I may have to re-think mine.
|
|
|
|
|
|
Rank: Senior Member Groups: Registered
Joined: 11/15/2012(UTC)
Posts: 720
Was thanked: 11 time(s) in 11 post(s)
|
"Y'all, How tall is that main tube, btw ? - 18"" ?
or is that a matter of taste (an prolly what it takes for the hydrometer I'm guessin') - I was reading thru this thread for the nth time and was a wondering specs.." |
|
|
|
|
|
|
Rank: Senior Member Groups: Registered, Moderator
Joined: 4/14/2010(UTC)
Posts: 1,666
Was thanked: 16 time(s) in 16 post(s)
|
If you measure your hydrometer up to the high proof mark or just below that would be the best measurement for your specific tool. I know some make em rather tall and thats not wrong. Remember not many of us can make 195 proof and virtually none of us can make 200 proof so why waste the copper tube cause you hydrometer will never sink that low.
|
|
|
|
|
|
Rank: Junior Member Groups: Registered
Joined: 1/7/2013(UTC)
Posts: 111
|
I went to Deep Homo and bought my tube. It was a 2' length so no matter what size I make the parrot, I'll have some left over. I was thinking about this very same subject and I thought I'd make mine to the 190 mark because there would be less likker in it.
|
|
|
|
|
|
Rank: Senior Member Groups: Registered
Joined: 11/15/2012(UTC)
Posts: 720
Was thanked: 11 time(s) in 11 post(s)
|
Originally Posted by: okie  I went to Deep Homo Ohh man, that is sooo much better of a moniker than "Home Creepo" Thanks, boys... I am starting to realize most of the joy in this is the gearing up to do it  |
|
|
|
|
|
|
Rank: Junior Member Groups: Registered
Joined: 3/22/2013(UTC)
Posts: 11
|
hi all,just a dumb ? but do you need the spirals or are they for looks or flow ? they all look nice
|
|
|
|
|
|
Rank: Junior Member Groups: Registered
Joined: 1/7/2013(UTC)
Posts: 111
|
I think that's just for looks. It does add a nice touch.
|
|
|
|
|
|
Rank: Senior Member Groups: Registered, Moderator
Joined: 4/14/2010(UTC)
Posts: 1,666
Was thanked: 16 time(s) in 16 post(s)
|
Originally Posted by: FAQs hi all,just a dumb ? but do you need the spirals or are they for looks or flow ? they all look nice No you don't need them at all...its just something that beat me so I --had--to keep trying. If you google parrots you'll see a myriad of different styles and I just wanted mine to be cool. But any way you make it go from the discharge spout into the parrot is just fine, after all its just a collection basin really.
|
|
|
|
|
|
Brewhaus Forum
»
General Topics
»
Our Projects
»
Simple Copper Parrot Construction
Forum Jump
You cannot post new topics in this forum.
You cannot reply to topics in this forum.
You cannot delete your posts in this forum.
You cannot edit your posts in this forum.
You cannot create polls in this forum.
You cannot vote in polls in this forum.