 Rank: Senior Member Groups: Registered, Moderator
Joined: 4/14/2010(UTC)
Posts: 1,666
Was thanked: 16 time(s) in 16 post(s)
|
"There has been so much disscusion on the topic of water heater element installation and placement in a keg that I figgered it was time to give my opinion with some pics to back it up, now with that said, remember I said ---my opinion. The possibilities are as endless as the members of a stillin website. I'm gonna point out the parts needed and where I placed mine so have a read and lets see if I can get the point across.  this thinking can be altered to install in any type boiler - copper - stainless keg - or whatever you can weld to.."
|
|
|
|
|
|
Rank: Senior Member Groups: Registered, Moderator
Joined: 4/14/2010(UTC)
Posts: 1,666
Was thanked: 16 time(s) in 16 post(s)
|
"In this photo I'm showing the parts and I'm gonna describe each one..... 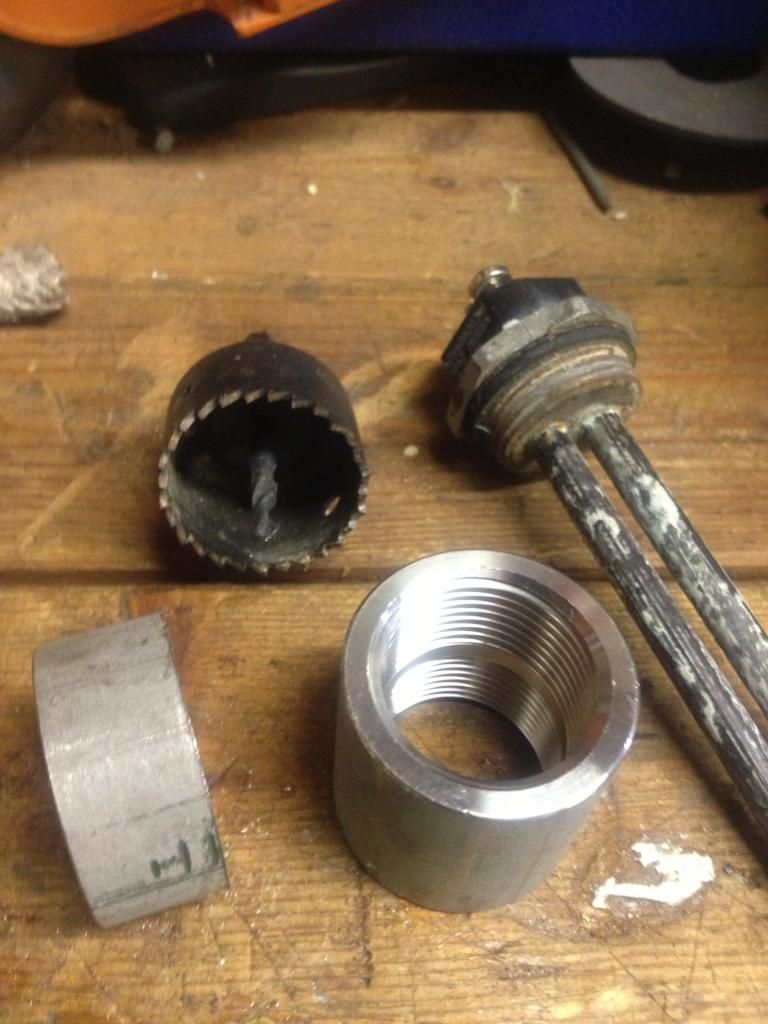 What you are looking at is the hole saw bit that you use to drill the keg...1"" and of course a heating element with the ((((NPT))) thread....National Pipe Thread then a S.S. half coupling, (the long one) if you look inside you will see a thread stop, you can screw the element in from either end ...if the threads were on the outside it would be called a nipple not a coupling and of course the threads are......((((National Pipe Thread threads)))) and since I'm really cheap I cut one in half ( i guess now you can call it a 1/4 coupling) so I could get 2 for the price of one... "
|
|
|
|
|
|
Rank: Senior Member Groups: Registered, Moderator
Joined: 4/14/2010(UTC)
Posts: 1,666
Was thanked: 16 time(s) in 16 post(s)
|
"This is how the coupling screws onto the element but its not tightened of course but you get the picture...and of course the coupling will be welded to the keg. 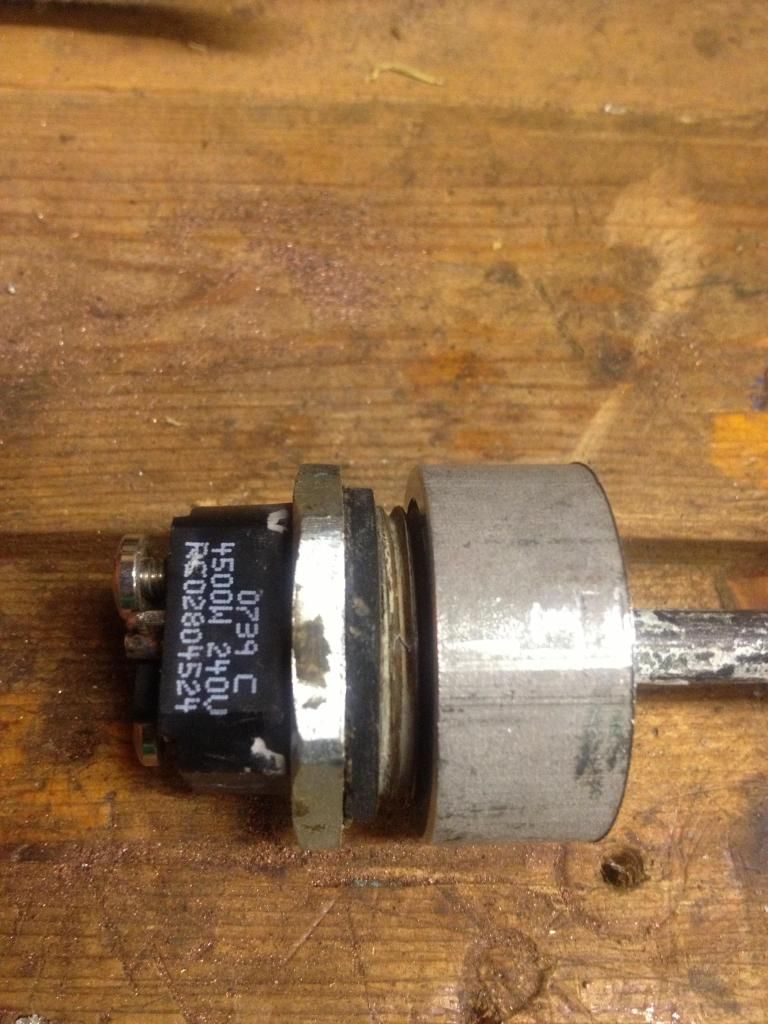 "
|
|
|
|
|
|
Rank: Senior Member Groups: Registered, Moderator
Joined: 4/14/2010(UTC)
Posts: 1,666
Was thanked: 16 time(s) in 16 post(s)
|
"This is the finished product welded in an ready for use.... 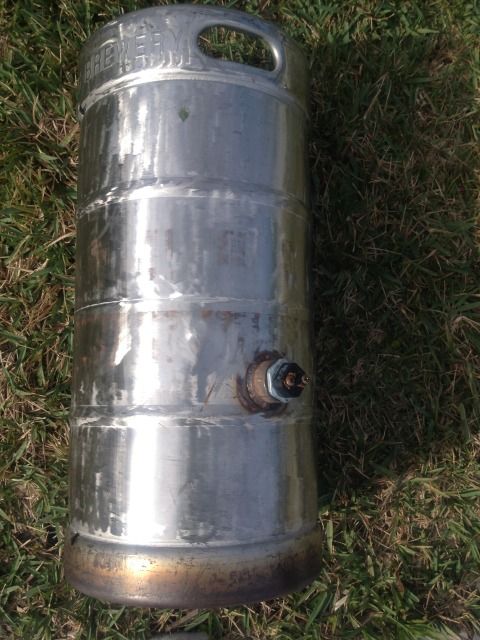 "
|
|
|
|
|
|
Rank: Senior Member Groups: Registered, Moderator
Joined: 4/14/2010(UTC)
Posts: 1,666
Was thanked: 16 time(s) in 16 post(s)
|
"And just a closeup of the weld.... 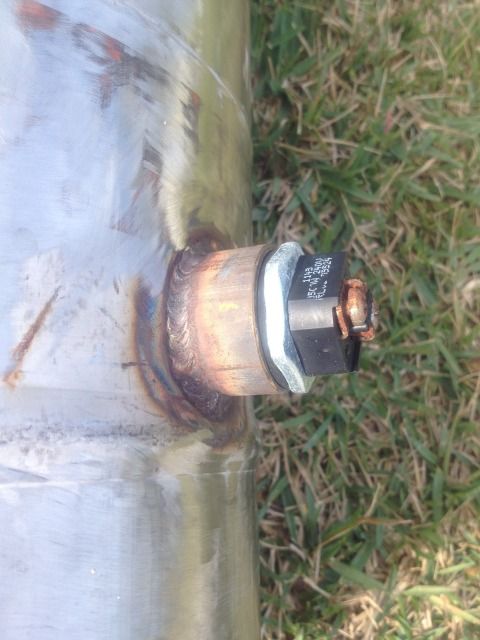 So now you know what it looks like and the components you need, and the terminology to order what you need to make this work. Its really that simple! "
|
|
|
|
|
|
Rank: Senior Member Groups: Registered, Moderator
Joined: 4/14/2010(UTC)
Posts: 1,666
Was thanked: 16 time(s) in 16 post(s)
|
"This one is placed approx. 6 inches from the bottom and if you wanted to add another one you just go 1/4 around the other side and go up or down to install. I only used one and it works like a charm, oh and I only use 110 so any garage or barn receptical will work since most are 15 amp but find a 20 amp circut just to be safe.
If I can help anybody with info plz dont hesitate to inquire..."
|
|
|
|
|
|
Rank: Senior Member Groups: Registered, Moderator
Joined: 4/14/2010(UTC)
Posts: 1,666
Was thanked: 16 time(s) in 16 post(s)
|
" Originally Posted by: heeler  This is the finished product welded in an ready for use.... And this has been talked about before too...if you look at the bottom of the keg you see results of fire or burning and thats because I use the turkey fryer to help get up to cooking temp and then turn the fire off and use just the element for cooking. One element will heatup but it takes longer so I push it up there with the fryer gas so it dosen't take as long to get there."
|
|
|
|
|
|
Rank: Senior Member Groups: Registered, Moderator
Joined: 4/14/2010(UTC)
Posts: 1,666
Was thanked: 16 time(s) in 16 post(s)
|
"This one is just to say see it does work.... 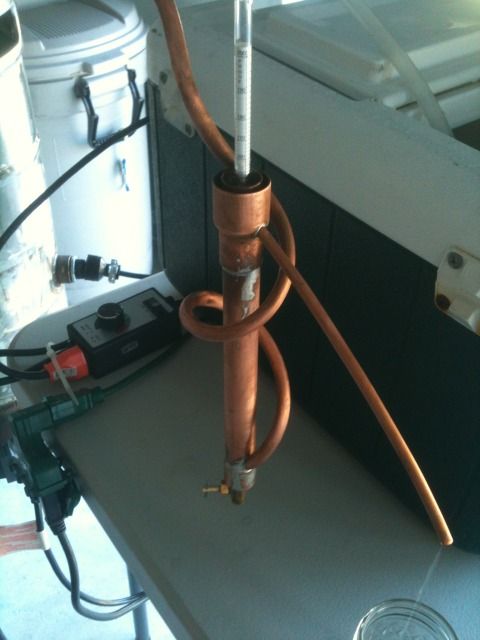 I hope you can see it in the background - shes up and running and producing...ok good luck and happy stillin."
|
|
|
|
|
|
Rank: Senior Member Groups: Registered, Moderator
Joined: 4/14/2010(UTC)
Posts: 1,666
Was thanked: 16 time(s) in 16 post(s)
|
"I want to add a few more pics to help get the idea across just in case I babble too much....this is the RSC'er I use, you can see its a 15 amp model but I couldn't find an actual name on it. It has the full power setting and a variable setting. And in the variable mode you use the dial to adjust the power up or down for more or less applied heat. I had to make that little pigtail but no big deal it wires to the element and plugs iinto the controller and the controller plugs into the receptical 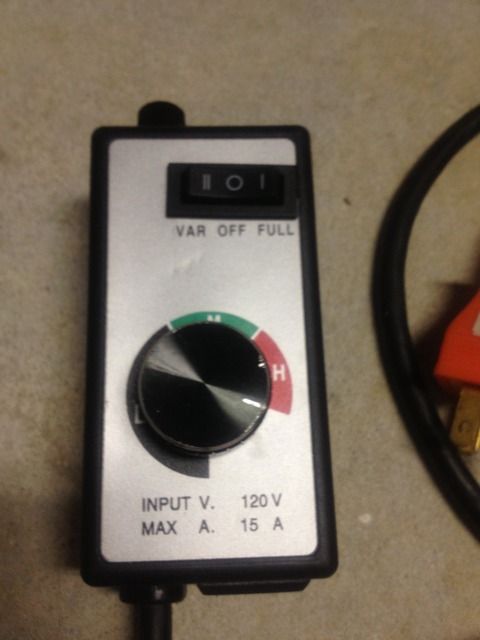 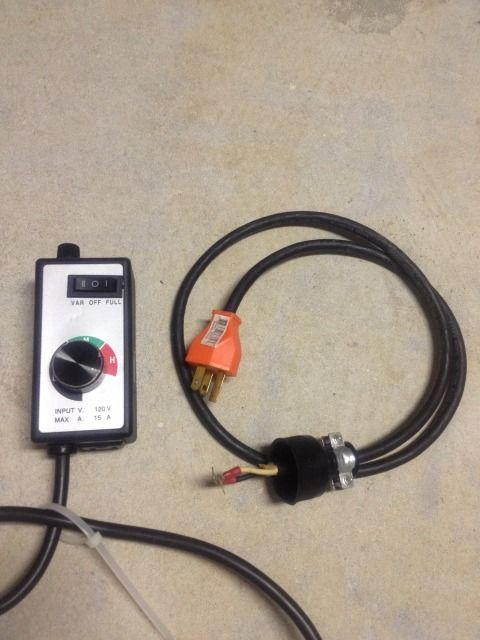 "
|
|
|
|
|
|
Rank: Senior Member Groups: Registered, Moderator
Joined: 4/14/2010(UTC)
Posts: 1,666
Was thanked: 16 time(s) in 16 post(s)
|
"So if you lay it all out in your mind you can see that the RSC'er plugs into the wall receptical and the pigtail plugs into the RSC'er and the pigtail is screwed right to the element to complete the flow of juice. The controller is just a rheostat, or a current adjustment if you will, you turn it up for more power and down for less. Ok so if all this helps get one person to use this method cool and if its not for you well thats cool too but it does work so happy stillin.. "
|
|
|
|
|
|
Rank: Senior Member Groups: Registered, Moderator
Joined: 4/14/2010(UTC)
Posts: 1,666
Was thanked: 16 time(s) in 16 post(s)
|
"From the pics in the previous post you can see that when I installed the wire to the element I just screwed it to the element. I just made this and it seems to be a little safer and easier to hook up and get ta cooking. The appliance is just a female for making a extention cord and I used 12 gauge wire that I had laying around, it is wire that is in your house (Romex I think) It's solid not multi-strand which is what I had before and it just seemed to flex and wiggle a little too much. Now it really solid and I just plug it in and I'm off and runnin. Also I used Scotty's idea with the ground wire and a hose clamp right to the SS coulpling. Works like champ.  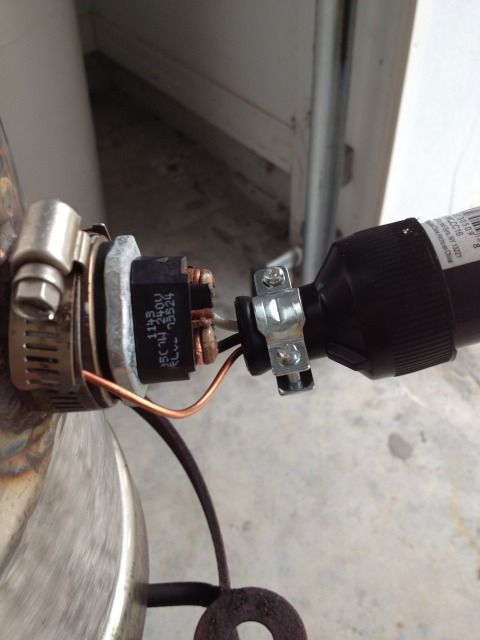 "
|
|
|
|
|
|
Rank: Senior Member Groups: Registered, Moderator
Joined: 4/14/2010(UTC)
Posts: 1,666
Was thanked: 16 time(s) in 16 post(s)
|
"And after all is said and done this is my rig up and runnin the end result you might say. You can see the hydrometer in the parrot and the cooler is my cold water for my condenser, this is just one of the setups I use and it seems to work quite well. The thermo in the tower is just a helper it's not a must to make a proper run, but no worries. I added this pic because I got a PM asking about it so pardon the post.  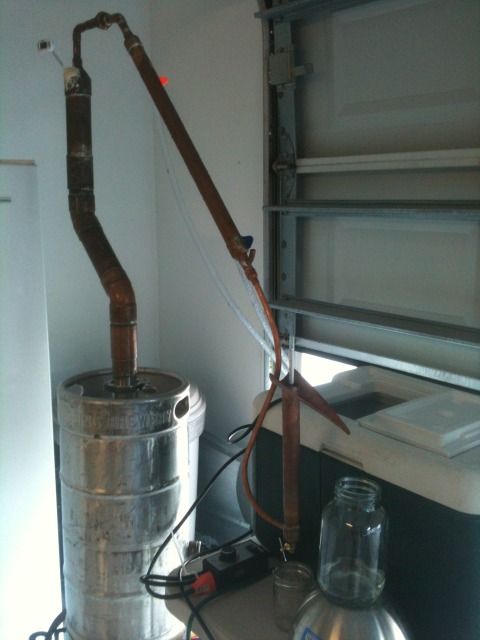 "
|
|
|
|
|
|
Rank: Senior Member Groups: Registered, Moderator
Joined: 4/14/2010(UTC)
Posts: 1,666
Was thanked: 16 time(s) in 16 post(s)
|
"And the results of a little test to show how safe this method is -- 7.18 amps / 95 volts on a 110v/30 amp circut, this is in the collection mode after heatup. In this pic I'm putting the tester electrodes right to the element screws for the reading 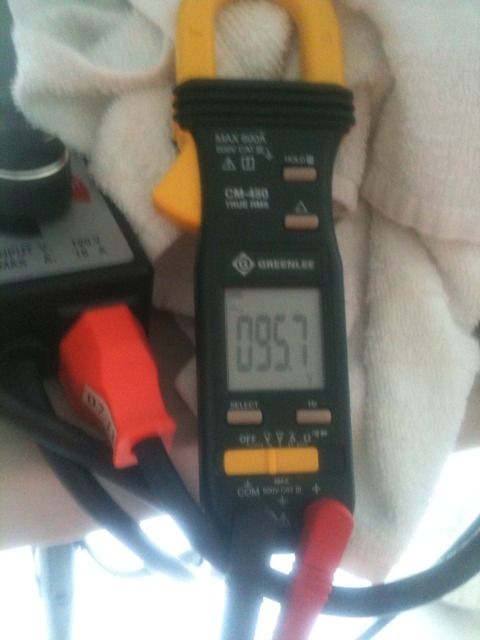 [URL=http://s921 And in this pic I have the amp jaws around the black wire to get the amp reading .photobucket.com/user/heelroper/media/632CDE31-9BBD-4551-9959-49FE6E2E06B1-97-000000086FC08F84.jpg.html] 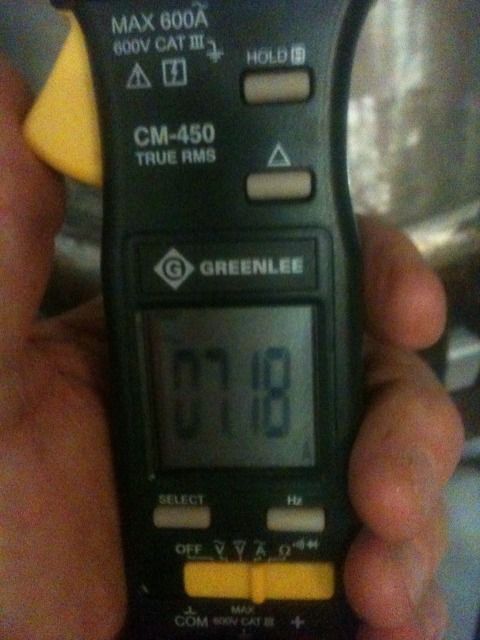 [/URL] Still pretty darn safe on any outlet you choose, in the garage or the barn or the back porch. "
|
|
|
|
|
|
 Rank: Junior Member Groups: Registered
Joined: 3/17/2013(UTC)
Posts: 14
|
very good,,, i can learn with pictures.....ty
|
|
|
|
|
|
 Rank: Newbie Groups: Registered
Joined: 9/1/2014(UTC)
Posts: 6
|
Nice thread heeler. I've got a 58 L keg pot that has 2 elements. The one at the 13 L level is a 2000 watt and the one at the 20 L level is a 1500 watt. Once I get my wash going what would you suggest for temp control. I've just been shutting the 2000 watt down but got to thinking I might be better off just reducing both and maybe keeping a a more dissipated heat. Any ideas?
|
|
|
|
|
|
Rank: Senior Member Groups: Registered, Moderator
Joined: 4/14/2010(UTC)
Posts: 1,666
Was thanked: 16 time(s) in 16 post(s)
|
"First -- thanks for the accolades on the post..
I can't say your setup is wrong if it's working for you but the norm for this setup with 2 elements is to ----plug one into a 110 outlet directly and the other one into something like a router speed controller. Use both elements on full until your up to cooking temp and then unplug the one that's plugged direct and then use just the one on the RSC'er to cook with. That way you can DIAL your temp in to that just right spot. If your just plugging them both into power then you have no real heat control, if you will!!!!!
Again if what your doing is workin for ya cool..........but this is something to ponder I guess."
|
|
|
|
|
|
Rank: Newbie Groups: Registered
Joined: 9/1/2014(UTC)
Posts: 6
|
heeler, I'm running a 4000 watt SCR controller (chinese) on each element. I'm running 220v into the controller box and then split it off to each of the controllers for the 110 elements. I can control each one from 20 volt to 120 volt independently. Sounds like you're doing well with just one element after you get up to temp so I'll continue doing the same. Which element do you have your controller on? The low or high position. I get better control with my 1500 watt element so I've been using it for the cook stage. I read an article that the chinese controllers are way over rated as far as wattage rating so I went to the higher rated units. I've done half a dozen runs with them and 2 full out stripping runs and they didn't heat up any more than the Canadian model I had on my 8 gallon rig. Thanks again for the post. Enjoyed it.
|
|
|
|
|
|
Rank: Newbie Groups: Registered
Joined: 9/1/2014(UTC)
Posts: 6
|
Also forgot to ask. Do you like the beak on your parrot better than a cup? It definitely looks appropriate.
|
|
|
|
|
|
Rank: Senior Member Groups: Registered, Moderator
Joined: 4/14/2010(UTC)
Posts: 1,666
Was thanked: 16 time(s) in 16 post(s)
|
"I can't say I like it better than the others, one thing I don't like with that one is the sweat from the condenser runs down the copper and hits that connection (where it's soldered to the beak ) and lets water drip into my collection jug. It's not the end of the world but it's just something to think about.
I just use whichever one my hand lands on when I'm setting up to make a run. I like em all since I made em all......"
|
|
|
|
|
|
Forum Jump
You cannot post new topics in this forum.
You cannot reply to topics in this forum.
You cannot delete your posts in this forum.
You cannot edit your posts in this forum.
You cannot create polls in this forum.
You cannot vote in polls in this forum.