 Rank: Senior Member Groups: Registered, Moderator
Joined: 7/25/2009(UTC)
Posts: 2,209
|
Here is a working mess that i want to remount and try to make it look a bit more professional. It will involve drilling 2--2 inch holes in a piece of plexiglass to re mount the volt and the amp meters, Then a thing that i'm not sure i can do. I need to make a rectangular hole in the plexiglass to re mount the PID control. This mess had 2 wooden sides but even a no talented guy like me was ashamed of how it looked. I am a total ZERO with art or wood working 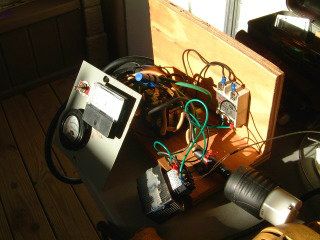 This next 2 pictures are of a failed attempt at trying to get the components neatly into a metal box 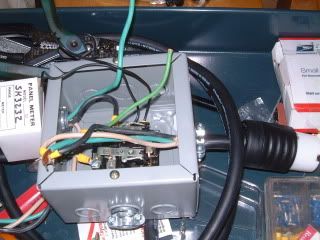 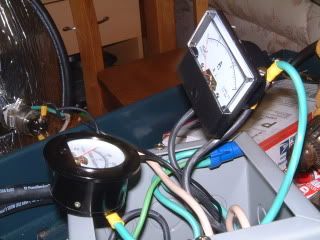
|
|
|
|
|
|
Rank: Senior Member Groups: Registered, Moderator
Joined: 7/25/2009(UTC)
Posts: 2,209
|
My recent failure--i tried to remount everything onto a plexiglass plate and the plexiglass cracked while i was drilling the 2 inch holes. I will next try 1/4 inch plywood  
|
|
|
|
|
|
 Rank: Junior Member Groups: Registered
Joined: 11/10/2012(UTC)
Posts: 85
|
" Scotty, when I do acrylic for fish tanks and sumps I actuall use a straightcut router bit in my small trim router and some wooden hole jigs I made to cut the holes in the acrylic. It cuts clean and fast."
|
|
|
|
|
|
Rank: Senior Member Groups: Registered, Moderator
Joined: 7/25/2009(UTC)
Posts: 2,209
|
When get back from philly on 12/4 ill get back to it-- for now im just goofing off
|
|
|
|
|
|
Rank: Junior Member Groups: Registered
Joined: 10/18/2012(UTC)
Posts: 20
|
Originally Posted by: scotty  Here is a working mess that i want to remount and try to make it look a bit more professional. It will involve drilling 2--2 inch holes in a piece of plexiglass to re mount the volt and the amp meters, Then a thing that i'm not sure i can do. I need to make a rectangular hole in the plexiglass to re mount the PID control. This mess had 2 wooden sides but even a no talented guy like me was ashamed of how it looked. I am a total ZERO with art or wood working This next 2 pictures are of a failed attempt at trying to get the components neatly into a metal box Scotty, I know I'm late with this... I have worked with Corian (acrylic) for over 30 years so I'm not blowing out my a$$. ALL plastics cannot have square corners anywhere. They are called "crack starters". Any hole must have a radiused inside corner. A square is a focal point that can crack on its' own (no obvious reason) but with any stress (heat or ?) will definitely cause it to crack from a corner. The thinner the material, the easier a crack. I would suggest at least, a 1/8" dia. inside corner but 3/16" would be better, 1/4" best (for 1/4" thick material). Hope this helps. If you can get Lexan, it is far more forgiving. Lexan is used in high damage potential environments, like that found in street light lenses... A great source for small pieces (< 1 sq. ft.) is from places like TAP PLASTICS who sell their cut-off materials cheap, like $1.00/ sq. ft.
|
|
|
|
|
|
Rank: Senior Member Groups: Registered, Moderator
Joined: 7/25/2009(UTC)
Posts: 2,209
|
"ok on all- i did learn to drill a nice hole in each corner to start the cutting-- ill be att it again in a week or so and looking for all the help i can get--ill see if lexan is available
thanks"
|
|
|
|
|
|
Rank: Junior Member Groups: Registered
Joined: 10/18/2012(UTC)
Posts: 20
|
Originally Posted by: scotty ok on all- i did learn to drill a nice hole in each corner to start the cutting-- ill be att it again in a week or so and looking for all the help i can get--ill see if lexan is available
thanks I forgot to tell you that "hole saws" are real risky in plastics unless one has a very stable method to do this. The large area the blade come in contact with the material tends to get uneven the larger the diameter. The blade only makes contact across at a small area causing it to grab and thus crack the plastic. In Corian, I used the router to even cut the faucet holes for counter tops with the sinks attached as one. Never use flat blade or paddle saws. A drill press is really the recommended method. The router method mentioned above is the best yet, but most guys don't have a router in their arsenal. Just my experiences...
|
|
|
|
|
|
Rank: Advanced Member Groups: Registered
Joined: 3/1/2012(UTC)
Posts: 198
|
I found using a holesaw on plastic its best to run it backwards. That way it won't grab. My experience is pretty much all with softer plastics though, that cut fairly easily.
|
|
|
|
|
|
Forum Jump
You cannot post new topics in this forum.
You cannot reply to topics in this forum.
You cannot delete your posts in this forum.
You cannot edit your posts in this forum.
You cannot create polls in this forum.
You cannot vote in polls in this forum.